C# 3D-Drawing
Cube with Shading
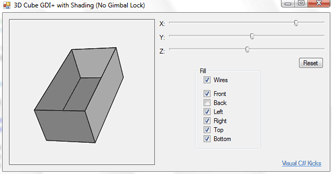
3D Graphics in C#
This article is based on the original Euler Rotation article. By improving the foundation and building upon it, we can create a shaded cube with only GDI+ and C#...
Avoiding Gimbal Lock
In the last 3D drawing article, we encountered the problem of Gimbal Lock. Largely it was due to the way the Cube class was structured, where all rotations where being applied every single time from scratch.
If instead rotations are applied and the resulting points stored, each successive rotation will be accurate and thus avoid gimbal lock.
Introducing Faces
Another improvement is to group the 3D points into points corresponding to each cube face. The advantages of that is we can avoid manually writing which points should connect to which when drawing the cube. All we have to do is tell how each face will be drawn and loop through all of them.
The faces class will only need some basic properties:
- Array of 2D points that correspond to the face
- Array of 3D points representing the corners of the face
- The side of the cube the face represents
- A 3D point that keeps track the center of the face
Then the face will need to have a CompareTo function that will compare the z values of the center point of the face:
public int CompareTo(Face otherFace)
{
     return (int)(this.Center.z - otherFace.Center.z);
}
2D Plotting Fixed
The 2D plotting has been revised for simplicity and a bug was fixed where everything was drawing backwards:
private PointF Get2D(Vector3D vec)
{
     PointF returnPoint = new PointF();

     float zoom = (float)Screen.PrimaryScreen.Bounds.Width / 1.5f;
     Camera tempCam = new Camera();

     tempCam.position.x = cubeOrigin.x;
     tempCam.position.y = cubeOrigin.y;
     tempCam.position.z = (cubeOrigin.x * zoom) / cubeOrigin.x;

     float zValue = -vec.z - tempCam.position.z;

     returnPoint.X = (tempCam.position.x - vec.x) / zValue * zoom;
     returnPoint.Y = (tempCam.position.y - vec.y) / zValue * zoom;

     return returnPoint;
}
This is very simple 3D projection. The X and Y values are simply x/z and y/z of the 3D point, factoring in the position of the camera. Then it values are multiplied by zoom to keep lines parallel to the screen.
Shading the Cube
Shading the cube is easier than it sounds. Each face will already be keeping track of its corresponding 2D corners. The quadrilateral it forms can be filled in using the Graphics FillPolygon function.
g.FillPolygon(Brushes.Gray, GetTopFace());
The real trick is drawing the faces in the correct order. To display the cube correctly, the faces that are farthest from the screen, or camera, are the ones that should be drawn first.
Thanks to our CompareTo function in the Faces class, you can simply put the 6 faces of the cube in an array and sort them. They will be sorted in order of which is closest to the screen. Since the closets faces should be draw last, simply iterate through the array backwards.
Conclusion
The result is impressive considering that it is all done with GDI+ and C#. Of course, to move to more powerful 3D images, you will need DirectX in C#. Make sure to download the source code and play around with it to get a feel of how powerful this can be.