C# Programming > Windows Forms
C# Angle and Altitude Selectors
(Photoshop-Style)

Introduction
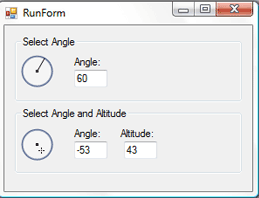
Adobe Photoshop has two very professional controls that are used for effects such as Drop Shadow and Bevel and Emboss. One being the angle selector control and the other being the angle and altitude selector control.
In this article we will go through the process of creating two C# custom controls to mimic the appearance and behavior of those in Photoshop.
The Foundation – Math to Know
Pythagoras Theorem
The Pythagoras Theorem lets us calculate the hypotenuse of a right triangle (the longest side). The formula is a2 + b2 = c2. Thus the hypotenuse, c, will always equal the square root of a2 + b2.
Unit Circle
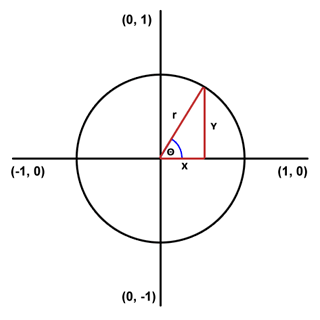
Since we will be working with angles and circle it will be helpful to be familiar with the format of a unit circle. The unit circle is simply a circle with radius of 1 centered at the point (0, 0) on a conventional grid. The angle 0 start at point (1, 0) [the right] and increases counterclockwise. Thus angle 90 is at (0, 1), angle 180 is at (-1, 0), angle 270 at (0, -1) and 360 back at the 0 spot.
Trigonometry
We will only need the three basic trig functions: sin, cos, and tan. If we remember soh cah toa we know that sine in a triangle is equal to the opposite leg over the hypotenuse, cosine is equal to adjacent over hypotenuse, and tangent is equal to opposite over adjacent.
Also remember that the inverse trig functions are used to calculate an unknown angle.
Common Functions
Both of our custom controls will share two important functions:
- One to take an angle and a radius and return the corresponding Point location on a circle around a specified origin. (Basically convert an angle to a point).
- One to do the opposite, take a point (X, Y) and find the closest matching angle.
The first function is the simpler of the two:
private PointF DegreesToXY(float degrees, float radius, Point origin)
{
     PointF xy = new PointF();
     double radians = degrees * Math.PI / 180.0;

     xy.X = (float)Math.Cos(radians) * radius + origin.X;
     xy.Y = (float)Math.Sin(-radians) * radius + origin.Y;
     return xy;
}
The thing to note is we first need to convert the angle into radians. (Converting Degrees into Radians). But for the general concept we only need to visualize our unit circle:

The function has the angle and radius, so using trig we can figure out the X and Y values as if it were a triangle. To center the values on the specified origin we only need to add the origin’s initial coordinates.
Also notice that the function uses the opposite value of the angle for the Y component. That is to accommodate the fact that the grid on the computer monitor is upside down compared to a conventional grid. (Positive values go downward on the computer).
The second function is so the user can click on our control and the point can be converted into a matching angle. It is only trickier because we need to add some things into consideration, to keep the article at a reasonable length, I’ll post part of it:
private float XYToDegrees(Point xy, Point origin)
{
     double angle = 0.0;
     if (xy.Y < origin.Y)
     {
          if (xy.X >  origin.X)
          {
               angle = (double)(xy.X  - origin.X) / (double)(origin.Y - xy.Y);
               angle = Math.Atan(angle);
               angle = 90.0 - angle * 180.0 / Math.PI;
          }
          else if (xy.X < origin.X)
          {
               //etc.
          }
     }
     else if (xy.Y > origin.Y)
     {
          //etc.
     }
     if (angle > 180) angle -= 360;
          return (float)angle;
}
The main gist of the function is to check the mouse’s position against the center of the control to determine on which of the four unit circle quadrants the point is in. Once we know the quadrant, we can use trig (the inverse of tangent) to figure out the angle.
For these controls I subtract 360 degrees from the angle if it’s larger than 180. This keeps the angles between -180 and 180 as Photoshop does. However that is optional and the control will work without that line.
Building the Control
Drawing the Control
The background for both controls will be the same:
- The outline of the circle drawn with a 2 point Pen
- A 40% opacity (about 100 value) white fill
- A 3x3 pixel square at the center of the control
protected override void OnPaint(PaintEventArgs e)
{
     //...

     //Draw
     g.SmoothingMode  = SmoothingMode.AntiAlias;
     g.DrawEllipse(outline, drawRegion);
     g.FillEllipse(fill, drawRegion);

     //...Marker
     g.SmoothingMode = SmoothingMode.HighSpeed;
     g.FillRectangle(Brushes.Black, originSquare);
     //...
}
The important part to note is the SmoothingMode property. Set it to AntiAlias when drawing the circle to make the control look smooth and professional. But if we draw the square with AntiAlias the edges come out fuzzy. The workaround is to set the SmoothingMode back to HighSpeed, making the edges sharp again.
The Marker part of the drawing depends on the control. The simple angle selector needs only create a line from the origin to the Point returned by our DegreesToXY function. The angle and altitude angle will instead plot a 1x1 rectangle at that point and then draw four cross marks.
Handling User Clicks
Handling the user clicks is extremely simple thanks to our XYToDegrees function. To successfully mimic the behavior of the Photoshop version of our controls we will need to set up the MouseDown and MouseMove events. That way the values and updated on-the-fly. Here is the helper function:
private int findNearestAngle(Point mouseXY)
{
     int thisAngle = (int)XYToDegrees(mouseXY, origin);
     if (thisAngle  != 0)
          return thisAngle;
     else
          return -1;
}
The altitude control will need an additional step, which is to find the distance between the center of the custom control and the mouse’s click point:
private int findAltitude(Point mouseXY)
{
     float distance = getDistance(mouseXY, origin);
     int alt = 90 - (int)(90.0f * (distance / origin.X));
     if (alt <  0) alt = 0;
          return alt;
}
Altitude, as measured in Photoshop, is 90 when the selected point is exactly on the origin and 0 when it is at the edge of the control. Thus we figure out the altitude by finding the ratio of the length of the radius and the length between the point clicked and the origin. Then subtract it from 90 to essential “flip” the values. (90 at 0 distance).
Custom Events
To make the custom controls even more professional they need to programmatically be able to alter when one of its values changed. This is where custom events come in.
For example, to create an event for when the angle changes, first it’s defined like so:
public delegate void AngleChangedDelegate();
public event AngleChangedDelegate AngleChanged;
Then all we need to do is call AngleChanged() (making sure that it isn’t null first) whenever we change the Angle property within the custom control.
Limitations and Improvements
Flickering
There is none! The .Net Framework 2.0 and up comes with the DoubleBuffer property that only needs to be set to true when constructing the control. The Framework takes care of the work to make sure the c# custom control is smoothly redrawn.
Size
Since both controls rely on math that assumes the radius to be equal at all times, the width and height dimensions must always be equal for the control to look and work correctly.
Colors
I did not include properties for the background and outline colors of the control since I was going for the Photoshop look. However look over the code and see that it wouldn’t be too hard to change the colors to your liking or even make them dynamic.
Conclusion
I recommend you download the C# project files (or at least the sample application) so you can see how well the C# custom controls come together.
As for the uses and applications of the controls, that is up to your imagination.