C# Programming > Windows Forms
C# Image Button
.NET Image Button
Adding a C# image button became incredibly easy with .NET Framework 2.0 and up. An image-button is a way to create a user-friendly .NET user interface.
As with many .NET controls, the key is setting the correct Properties.
Image Property
The first property you want to modify is Image. The image will have to be a resource of the Form. However it is a good idea in most cases to let it be a project resource so the image can accessed anywhere in the project.
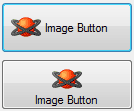
TextImageRelation
This is a great .NET control property: TextImageRelation. It has 5 options and they are pretty self-explanatory. Basically it denotes the order in which text and image of a C# button are rendered. Here is some different looks that can be achieved:
It is not a good idea to set TextImageRelation to Overlay if your .NET button has both text and an image since the text won't be readable. However if the button has no text, it looks good:
![]()
Of course since these are .NET control properties we are talking about, they can updated run-time, opening up a world of possibilites. For example, a series of menu buttons can have the option of displaying text along side each icon or just displaying the icon.
.NET Button
So as you can see it does not take too much work to have a great looking .NET image button. Starting from the .NET Framework 2.0 these image buttons are fairly constant with different FlatStyle and versions of Windows.
However one "problem" is that the button is tied to Windows' version. An image button might look very good in Windows Vista or Windows 7 but might not look as eye-candy in older versions of Windows. For those looking for a more constant look across versions would have to turn to code-generated .NET buttons.
And finally, in order to get a good-looking C# image button you are going to need good icons. Here is where many programmers considering investing in professional icons.